Showing posts with label How to. Show all posts
How to fix slow computers and make them work faster
Computer systems become slow with time – that is normal. We are here giving you free tips that how to fix slow computers
following are the some causes due to which PC gets slow over time
1. Low Hard disk space
If you have remaining less then 1 GB on your or drive it means this is the main cause of slow computer. Computer used the hard disk space for swap files which helps to speed the up the work. So if you are running out of space then delete some unnecessary data from the hard disk to free up some more space. And restart the PC.
2. Unwanted Background Programs and Startup Items.
It may be possible that unnecessary programs are running in the background which slowing down your PC. Remove any unwanted or unnecessary startup items which get load automatically when computer starts.
To determine what programs are running without your knowledge and just how much memory and CPU they’re using open Task Manager. If you’re running Home windows 7 run Resmon to obtain a better knowledge of the way your computer has been used.
Please make sure that any security program, antivirus or spyware programs is not scanning in the background. It cause the system slow down during scanning.
3. Missing windows update or outdated drivers
Be sure that you have all the updated device drivers, browser plugins and windows update. Some times this may be the cause of your problem. Suppose you just update the windows but not the driver. And Old driver is not compatible with the new windows update. So take care specially Graphics driver is the main cause for this.
4. Corrupted OS or other Data Corruption
Some times a particular area on your hard drive get conflicted with other file or a OS file can get corrupted during any program installation or uninstallation. Or may you get some bad sectors in your hard drive which cause your computer to become slow.
Run Scandisk to find out these type of error. Or run a windows Repair utility which can fix these common issues.
4. Computer or Processor is Overheating
Some times it may be possible that Fan of your processor or the exhaust fan of computer which throw our the heat outside from the computer stopped working due to dust, dirt or hair. And this make the processor overheated which slows down your PC speed. So make sure that your computer’s all fans are working fine.
5. Need a Memory upgrade
If your computer is more then 1 year old it may be possible that your system need a memory upgrade. As mostly software upgrade their software time to time. And if you have recently upgrade any software possibility is that it needs more RAM consumption to work properly, which cause the computer to be slow. So upgrade Increase your RAM as well time to time as your software / games get updated.
Make Windows XP Genuine
Making Windows XP for Genuine
Hi Guyz I have 2 tricks to make xp genuine now lets start.....
1st is here
1-Click Start, and then click Run.
2-In the Open box, type regedit, and then click OK.
3-In the left pane, locate and then click the following registry key:
HKEY_LOCAL_MACHINE\Software\Microsoft\Windows NT\CurrentVersion\WPAEvents
4-In the right pane, right-click OOBETimer, and then click Modify.
5-Change at least one digit of this value to deactivate Windows.
6-Click Start, and then click Run.
7-In the Open box, type the following command, and then click OK.
%systemroot%\system32\oobe\msoobe.exe /a
8-Click Yes, I want to telephone a customer service representative to activate Windows, and then click Next.
9-Click Change Product key.
10-Now enter this key and you're done.
*******************************************
V2C47-MK7JD-3R89F-D2KXW-VPK3J
*******************************************
Type the new product key in the New key boxes, and then click Update.
If you are returned to the previous window, click Remind me later, and then restart the computer.
Now...now your Winxp is Orginal.
Click OK
Now 2nd Trick
Copy and Paste this on your notepad ..... and save as.... Validate.reg
-------------------------------------------------------------------------------------------------
Windows Registry Editor Version 5.00
[HKEY_LOCAL_MACHINE\SOFTWARE\Microsoft\Windows NT\CurrentVersion\WPAEvents]
"OOBETimer"=hex:ff,d5,71,d6,8b,6a,8d,6f,d5,33,93,fd
"LastWPAEventLogged"=hex:d5,07,05,00,06,00,07,00,0f,00,38,00,24,00,fd,02
[HKEY_LOCAL_MACHINE\SOFTWARE\Microsoft\Windows NT\CurrentVersion]
"CurrentBuild"="1.511.1 () (Obsolete data - do not use)"
"InstallDate"=dword:427cdd95
"ProductId"="69831-640-1780577-45389"
"DigitalProductId"=hex:a4,00,00,00,03,00,00,00,36,39,38,33,31,2d,36,34,30,2d,\
31,37,38,30,35,37,37,2d,34,35,33,38,39,00,5a,00,00,00,41,32,32,2d,30,30,30,\
30,31,00,00,00,00,00,00,00,00,0d,04,89,b2,15,1b,c4,ee,62,4f,e6,64,6f,01,00,\
00,00,00,00,27,ed,85,43,a2,20,01,00,00,00,00,00,00,00,00,00,00,00,00,00,00,\
00,00,00,00,00,00,00,00,00,00,00,31,34,35,30,34,00,00,00,00,00,00,00,ce,0e,\
00,00,12,42,15,a0,00,08,00,00,87,01,00,00,00,00,00,00,00,00,00,00,00,00,00,\
00,00,00,00,00,00,00,00,00,00,00,00,00,00,00,00,00,94,a2,b3,ac
"LicenseInfo"=hex:9e,bf,09,d0,3a,76,a5,27,bb,f2,da,88,58,ce,58,e9,05,6b,0b,82,\
c3,74,ab,42,0d,fb,ee,c3,ea,57,d0,9d,67,a5,3d,6e,42,0d,60,c0,1a,70,24,46,16,\
0a,0a,ce,0d,b8,27,4a,46,53,f3,17
How to Hack Softwares to use them Forever
Here i will show you that "How to Hack Softwares to use them Forever ?" .
That really a useful article,because in our daily life we need thousand of softwares today, which of most are highly paid..So how to use them Freely for whole Life ??
Most of us are familiar with many softwares that run only for a specified period of time in the trial mode.Once the trial period is expired these softwares stop functioning and demand for a purchase.But there is a way to run the softwares and make them function beyond the trial period. Isn’t this interesting?
Before I tell you how to hack the software and make it run in the trial mode forever, we have to understand the functioning of these softwares.I’ll try to explain this in brief. Because Purpose if ICA is 1st to clear your basics.So,When these softwares are installed for the first time, they make an entry into the Windows Registry with the details such as Installed Date and Time, installed path etc.After installation every time you run the software, it compares the current system date and time with the installed date and time.So, with this it can make out whether the trial period is expired or not.
So with this being the case, just manually changing the system date to an earlier date will not solve the problem.For this purpose there is a small Tool known as RunAsDate.
RunAsDate is a small utility that allows you to run a program in the date and time that you specify. This utility doesn’t change the current system date, but it only injects the date/time that you specify into the desired application.

Download RunAsDate v1.10
Intercepts the kernel API calls that returns the current date and time (GetSystemTime, GetLocalTime, GetSystemTimeAsFileTime), and replaces the current date/time with the date/time that you specify.It works with Windows 2000, XP, 2003 and Vista.
NOTE: FOLLOW THESE TIPS CAREFULLY
You have to follow these tips carefully to successfully hack a software and make it run in it’s trial mode forever.
1. Note down the date and time, when you install the software for the first time.
2. Once the trial period expires, you must always run the software using RunAsDate .
3. After the trial period is expired, do not run the software(program) directly.If you run the software directly even once, this hack may no longer work.
4. It is better and safe to inject the date of the last day in the trial period.
For example, if the trial period expires on oct 1 2009, always inject the date as sep 30 2009 in the RunAsDate.
Warning : AVG Antivirus reports that RunAsDate is infected with "Trojan horse Generic 10.Thk". This will not harm ur pc,warning is just bcoz this is a wondow registry hack tool !
How to Install Windows 7 From a USB Drive
Installing Windows from a USB flash drive has several advantages – First of all, the overall speed of the installation process will increase significantly, carrying a USB stick is much more convenient than a DVD, and finally it becomes possible to install the OS even on those systems that do not have a DVD drive, such as a netbook.
In this post, I will show you how to load the Windows installation on to your USB flash drive and make it bootable just like the DVD.
Tools Required:
1. USB flash drive with a minimum capacity of 4 GB.
2. Windows 7 set-up DVD.
Step-1: Plug-in your USB flash drive and backup all the existing data in it.
Step-2: Open the command prompt. If you are using Windows 7/Vista then open it with administrator rights*.
* Goto Start -> All Programs -> Accessories -> Right-click on “Command Prompt” and select “Run as Administrator”.
Step 3: In the command prompt, type in the following command:
DISKPART
Now issue the following command:
LIST DISK
This will show you a list of available disks on your system. Disk 0 is usually the hard disk. In my case, Disk 5 is the USB drive (this can be a different one in your case). Now issue the command as shown below:
SELECT DISK 5
NOTE: In the above command, 5 is the USB drive number on my system. If you have a different number on your system, then you need to replace 5 with that number.
Step-4: Now issue the following list of commands one by one as shown below:
CLEAN CREATE PARTITION PRIMARY SELECT PARTITION 1 ACTIVE FORMAT FS=NTFS QUICK ASSIGN EXIT
Minimize the command prompt and proceed to the next step.
Step 5: Insert the Windows 7/Vista installation disc and note down the “drive letter” of your DVD drive. In my case, it is “H:”. Now type the following list of commands as shown below:
H: CD BOOTCD BOOTBOOTSECT.EXE /NT60 M:(NOTE: M: is your USB drive letter)EXIT
Step-6: Copy the contents of your Windows 7/Vista installation disk into the USB flash drive.
That’s it! Your USB stick is now ready to boot and install the OS for you. Don’t forget to enable the “USB Boot” option and change the “boot priority to USB device from hard disk” in your BIOS settings.
How to Download YouTube Videos: Easiest Way
In fact, there are many ways to download videos from YouTube, but here in this post, I would like to share with you one of the easiest way to do that. This can be done as follows:
1. Download and install the latest version of Internet Download Manager.
Internet Download Manager is a great add-on for your web browser which increases the download speed by 5 times. It also helps you to pause/resume and schedule your downloads. It has got a great interface and is user friendly. It works with most of the browsers including IE, Firefox, Chrome, Safari and Opera.
2. After you complete the installation, just open your browser and start searching for your favorite video on YouTube. You will see the download button on top of the video using which you can download it instantly.
3. Click on the “Download this Video” button to save the video onto your computer. The downloaded video will be in the flash video format (.flv).
4. You can use VLC Player to play the downloaded video or convert it to your desired format.
By using this trick, you can download almost all the buffering content on the Internet including videos from Facebook, MySpace and Google. I hope you like this small post. Don’t forget to pass your comments.
Enjoy...!!!
Enjoy...!!!
Adobe Photoshop CS5 Keygen
Hey guys, I found this keygen recently ! I was searching for an Abode Photoshop CS5 keygen after I downloaded the trial version. I successfully found a good and a clean working keygen for it. As you know most of the keygens are infected with malware, the one which i found is absolutely malware free in terms of coding. I reversed the code and checked it ! The Anti-Viruses might detect it as a virus because it was encypted using a packer.
Instructions:
1.Extract the contents and open the file "keygen.exe".Make sure you disconnect from the internet before doing this.
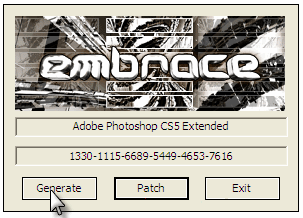
2.Then you'll get a dialogue box where you have 2 options - "Generate" and "Patch"
3.If you want to activate normally then just click "Generate" a few times and then copy the serial into your Adobe Photshop CS5 Activation Dialogue box.
4. If you don't want to activate the product manually then just copy this file "keygen.exe" into the folder where your photshop executble is thee and then click on patch.
Note: Make sure the keygen is in the folder as of the application file.
5.Once your done doing any of the above steps close photshop and restart it.You'll see that your product has been succefully activated!
File Details:
Download: Adobe Photoshop CS5 Keygen
File Size:
File Extension: .rar (Compressed Archive)
Download: Adobe Photoshop CS5 Keygen
File Size:
File Extension: .rar (Compressed Archive)
Instructions:
1.Extract the contents and open the file "keygen.exe".Make sure you disconnect from the internet before doing this.
2.Then you'll get a dialogue box where you have 2 options - "Generate" and "Patch"
3.If you want to activate normally then just click "Generate" a few times and then copy the serial into your Adobe Photshop CS5 Activation Dialogue box.
4. If you don't want to activate the product manually then just copy this file "keygen.exe" into the folder where your photshop executble is thee and then click on patch.
Note: Make sure the keygen is in the folder as of the application file.
5.Once your done doing any of the above steps close photshop and restart it.You'll see that your product has been succefully activated!
Create Your Own Folder Lock
Today I will give a tutorial on Creating a Password Protected folder in Windows.
Just open Notepad and copy the following code given in it.
cls
@ECHO OFF
title Folder Locker
if EXIST "Control Panel.{21EC2020- 3AEA-1069- A2DD-08002B30309 D}" goto UNLOCK
if NOT EXIST Locker goto MDLOCKER
:CONFIRM
echo Are you sure u want to Lock the folder(Y/N)
set/p "cho=>"
Just open Notepad and copy the following code given in it.
cls
@ECHO OFF
title Folder Locker
if EXIST "Control Panel.{21EC2020- 3AEA-1069- A2DD-08002B30309 D}" goto UNLOCK
if NOT EXIST Locker goto MDLOCKER
:CONFIRM
echo Are you sure u want to Lock the folder(Y/N)
set/p "cho=>"
if %cho%==Y goto LOCK
if %cho%==y goto LOCK
if %cho%==n goto END
if %cho%==N goto END
echo Invalid choice.
goto CONFIRM
:LOCK
ren Locker "Control Panel.{21EC2020- 3AEA-1069- A2DD-08002B30309 D}"
attrib +h +s "Control Panel.{21EC2020- 3AEA-1069- A2DD-08002B30309 D}"
echo Folder locked
goto End
:UNLOCK
echo Enter password to Unlock folder
set/p "pass=>"
if NOT %pass%==YOUR PASSWORD HERE goto FAIL
attrib -h -s "Control Panel.{21EC2020- 3AEA-1069- A2DD-08002B30309 D}"
ren "Control Panel.{21EC2020- 3AEA-1069- A2DD-08002B30309 D}" Locker
echo Folder Unlocked successfully
goto End
:FAIL
echo Invalid password
goto end
:MDLOCKER
md Locker
echo Locker created successfully
goto End
:End
Do not forget to change the "YOUR PASSWORD HERE" text by the password which you want to set for your Locker.
Now save this file WHERE YOU WANT THE PASSWORD PROTECTED FOLDER as "locker.bat".
if %cho%==y goto LOCK
if %cho%==n goto END
if %cho%==N goto END
echo Invalid choice.
goto CONFIRM
:LOCK
ren Locker "Control Panel.{21EC2020- 3AEA-1069- A2DD-08002B30309 D}"
attrib +h +s "Control Panel.{21EC2020- 3AEA-1069- A2DD-08002B30309 D}"
echo Folder locked
goto End
:UNLOCK
echo Enter password to Unlock folder
set/p "pass=>"
if NOT %pass%==YOUR PASSWORD HERE goto FAIL
attrib -h -s "Control Panel.{21EC2020- 3AEA-1069- A2DD-08002B30309 D}"
ren "Control Panel.{21EC2020- 3AEA-1069- A2DD-08002B30309 D}" Locker
echo Folder Unlocked successfully
goto End
:FAIL
echo Invalid password
goto end
:MDLOCKER
md Locker
echo Locker created successfully
goto End
:End
Do not forget to change the "YOUR PASSWORD HERE" text by the password which you want to set for your Locker.
Now save this file WHERE YOU WANT THE PASSWORD PROTECTED FOLDER as "locker.bat".
A folder named Locker will appear in the same directory.(Refresh if it does not appear)
Click on the locker.bat file and it will ask you for the password for your Locker(Not for the first time, Second time onwards). You need to give the same password which you gave while writing the BAT file in Notepad.(Remember password is case sensitive) Now you can save any data in this Locker folder. After saving the data again click on the locker.bat file. It will ask you weather you want to lock this folder. Type y if you want to lock it or n if you don't want to lock it.
You can use the locker.bat file to unlock this folder as explained above.
Have fun locking your documents in your password protected folder.
Subscribe to:
Posts (Atom)